Noutați

It’s that time of the year again!

Let’s celebrate this holiday season and end the year on a positive note. During December 2021 only, TMS is doing an extra effort and offers everyone special upgrade prices. Upgrade your licenses to TMS ALL-ACCESS bundle today, before 2022 price adaptions! Get full access with:  Easy plan: All current and new products for 1 price! Easy renewal: Yearly renewal only for 495 EUR! Easy install: all products accessible via TMS Subscription Manager tool Easy support: Full online support center access to all areas Easy up-to-date: Early access to product betas Easy learning: Access to TMS WEB Academy Act now! If you would like to continue to benefit from our priority support services and development on new and existing components, we have special upgrade offers for you! Contact sales@tmssoftware.com for the best discount upgrade offer for TMS ALL-ACCESS, depending on your currently purchased products. Take advantage of upgrade discounts now and be safe against future price adaptions!Please note this offer is valid until December 31, 2021!

Read More

Extjs Tutorial For Beginners: 10 Things I Wish I’d Known Earlier

  ExtJS or Extended JavaScript is a comprehensive JavaScript framework developed by Sencha for building comprehensive web and mobile applications. Today, you can use more than 140+ UI components like calendars, grids, trees, lists, forms, menus, toolbars, panels, windows, and hundreds of different extensions. So are you someone who is looking to build stunning web and mobile UIs using ExtJS? Then stop for a while and read through my introspection about what I wish I had known before starting this awesome journey. Why do I need to know JavaScript and OOP? To get started with ExtJS, you need basic HTML, CSS, and JavaScript programming. But, it is really helpful if you have a general idea of object-oriented programming (OOP) concepts and how to reuse code with them.  Especially if you come from a different programming background like C, C++, or Java, learning Javascript will make things much clearer when working with Ext Js. Finding an ExtJs tutorial for beginners is really helpful. Ext Js takes a Javascript first approach to reuse code with classes, similar to HTML elements and containers. So if you do not understand OOP concepts in Javascript, make sure to brush up your skills with some ebooks, tutorials, or online courses. Why is Sencha Cmd important? Sencha Cmd is the tool that automates your Sencha Ext JS applications from creating your initial project structure to generating deployable apps. Therefore, it is imperative to know about Sencha cmd, what it does and how to use it. Make sure to read through the Sencha Cmd to get familiar with it before starting development. How can I speed up the development? If you want to spend less time on manual coding and accelerate your development, consider using Sencha Architect so that you can build UIs using drag and drop features. The code that automatically generates is optimized for high performance, and you can avoid errors you do when coding manually.  How can I use the MVC design pattern? With a basic understanding of Javascript and OOP concepts, understanding Javascript design patterns is also important. Ext Js uses Model View Controller (MVC) design pattern from which its project structure has been formulated. Although it is not a must to use, I recommend better organizing your project structure. To work with MVC, know where to place your code for your UI, data, and the controller logic in your application. Therefore, it is good to know how  MVC works together to create a working web application in Ext Js.  Where to use the MVVM design pattern? Another design pattern you must be aware of is MVVM which stands for Model–View–ViewModel. Unlike MVC, the execution entry point of MVVC is the view, and it separates the development of UI using a mark-up language. The ViewModel uses the data binding technique to coordinate changes between the data model and the view. So know where to use MVC and MVVM based on what you will develop. Is implementing routing at the beginning a good idea? If you are using forward and back buttons for your website users, you will need to support routing in your application. You can use routing to track the state of your application, but it is not for storing session data. You can also create deep links to directly access a specific […]

Read More

How To Make A Fully Working Slack Bot In Under 10 Minutes

Slack is one of the leading communication platforms for millions of users. You can send instant messages, share documents, share images, and perform many different actions which improve the collaboration between team members. You can also automate and control many outside processes and even smart hardware with Bots in Slack. The best thing of all is you can create Slack bots VERY EASILY using RAD Studio Delphi. What is SDriver? SDriver is a Delphi wrapper for Slack API by Andrea Magni who is one of our fabulous Embarcadero MVP team. SDriver is a free and open-source wrapper for Delphi developers. The best thing is that the wrapper utilizes the native HTTP client libraries for each supported platform – System.Net.HttpClient. SDriver is also implemented with the System. Threading library to work asynchronously. What are the features of SDriver? Compatible with FireMonkey, Visual Component Library, and also Non-visual components Support for Message Attachments Support for Incoming Webhooks Implemented using Native HTTP Client Libraries Async implementation using Parallel Programming Library What are Incoming Webhooks? Incoming Webhooks are a simple way to post messages from apps into Slack. By creating Incoming Webhooks you get a unique URL which you can send a JSON payload with the message text and some options. Andrea’s source code repository contains links to explain this in more depth as does the official Slack website. POST https://hooks.slack.com/services/T00000000/B00000000/XXXXXXXXXXXXXXXXXXXXXXXX Content-type: application/json { “text”: “Hello, world.” } POST https://hooks.slack.com/services/T00000000/B00000000/XXXXXXXXXXXXXXXXXXXXXXXX Content–type: application/json {     “text”: “Hello, world.” } implementation {$R *.dfm} uses System.Diagnostics , SDriver.Message, SDriver.Interfaces, SDriver.IncomingWebHook; procedure TForm1.SendActionExecute(Sender: TObject); var LWebHook: IMessageBuffer; LMessage: IMessage; LStopWatch: TStopWatch; begin LStopWatch := TStopWatch.StartNew; LMessage := TMessage.Create(EditMessage.Text + ‘ [‘ + TimeToStr(Now) + ‘]’); LMessage.UserName := EditUserName.Text; LMessage.Icon_URL := EditIcon_URL.Text; LMessage.Icon_Emoji := EditIcon_Emoji.Text; LMessage.Channel := EditChannel.Text; LWebHook := TIncomingWebHook.Create(EditWebHookURL.Text, False); LWebHook.Push(LMessage); LWebHook.Flush; end; procedure TForm1.SendActionUpdate(Sender: TObject); begin SendAction.Enabled := (EditWebHookURL.Text ”) and (EditMessage.Text ”); end; 1 2 3 4 5 6 7 8 9 10 11 12 13 14 15 16 17 18 19 20 21 22 23 24 25 26 27 28 29 30 31 32 implementation   {$R *.dfm}   uses   System.Diagnostics , SDriver.Message, SDriver.Interfaces, SDriver.IncomingWebHook;   procedure TForm1.SendActionExecute(Sender: TObject); var   LWebHook: IMessageBuffer;   LMessage: IMessage;     LStopWatch: TStopWatch; begin   LStopWatch := TStopWatch.StartNew;     LMessage := TMessage.Create(EditMessage.Text + ‘ [‘ + TimeToStr(Now) + ‘]’);   LMessage.UserName := EditUserName.Text;   LMessage.Icon_URL := EditIcon_URL.Text;   LMessage.Icon_Emoji := EditIcon_Emoji.Text;   LMessage.Channel := EditChannel.Text;     LWebHook := TIncomingWebHook.Create(EditWebHookURL.Text, False);   LWebHook.Push(LMessage);   LWebHook.Flush; end;   procedure TForm1.SendActionUpdate(Sender: TObject); begin   SendAction.Enabled := (EditWebHookURL.Text > ”) and (EditMessage.Text > ”); end; Check out the SDriver now! Do you want to see how fast development with RAD Studio and Delphi can be – why not download a free trial now?

Read More

This Is How To Outsmart Your Peers On Automation

What is Industrial Automation? Industrial automation is the technology by which a process or procedure is performed with minimal human assistance. For instance: Machinery, processes in factories, boilers, and heat-treating ovens Steering and stabilization of ships Aircraft and other applications and vehicles with reduced human intervention All sorts of machinery are examples of automation. The common control types are On/Off which is discrete it’s either doing it or it’s not doing it. There’s PID (proportional integral derivative) which is interesting, and logical sequence or state system control – “moving from step A to step B” types of activities. What does lab monitoring and instrumentation mean? Lab monitoring and instrumentation is just the process of reading sensors to collect information from devices that define physical qualities. For example, in a lab, if you’re experimenting and you need to know what the state is of the experiment at all times as you’re collecting data. In industry, an example would be if you need to be monitoring machinery and make sure they are working properly. There are some examples of the type of settings information you may be gathering through monitoring or instrumentation. What single board devices are available for starting automation? Thousands of different single-board computers can be utilized in automation. Typically, these devices have an interface called ‘GPIO’ pins on them. These pins can, for example, be attached to and thus read and write various sensors. Here are some examples of single-board devices: UDOO x86 II – Intel Celeron N3160 2.24Ghz UP Board – Intel Atom x5-78350 LattePanda Delta 432 – Intel 8th Gen Celeron N4100 Atomic Pi – Intel Atom x5-78350 quad-core with 2M Cache What is a PID Controller? Essentially a PID Controller creates a control/loop mechanism to use feedback for continuous correction. This means is it measures the performance of the control system.  PID – AKA “Three-term controller” A control loop mechanism employing feedback for continuous correction For example, cruise control on a car. What is a Programmable Logic Controller (PLC)? A PLC is a programmable logic controller – this is similar to Arduino.  Ruggedized industrial digital computer Replaces hardwired relays Makes use of multiple digital and analog I/O Function as a real-time system collecting information and constantly correcting operations Similar o Remote Terminal Units except RTUs do not have control loops or algorithms Often networked together with other PLC and SCADA systems One of three common Industrial Control Systems with SCADA and Distributed Control System (DCS)  What communication libraries are available for Delphi & C++ Builder? AsyncPro – https://github.com/TurboPack/AsyncPro ComPort Library – https://sourceforge.net/projects/comport/ WinSoft ComPort – https://winsoft.sk/comport.htm TciaComPort – https://www.mestdagh.biz/ ZylSerialPort – https://www.zylsoft.com/serialport.htm Moreover, when you install Delphi and C++ Builder these components will be installed: Indy Components THTTPClient TBluetoothDevice TBluetoothLEDevice What is Visuino? Visuino or Visuino Pro is visual programming for Arduino and PLC. It is built by Boian Mitov who is the founder of Mitov Software. Besides Visuino, Mitov Software offers a set of components and libraries like: ControlLab for industrial automation components SignalLab for digital signal processing (DSP) LogicLab, Plotlab, and more Visuino Pro is designed around the additional use case as additional functionality that comes with programmable logic controllers. It also has the ability that you can see the code that it’s going to generate back and forth.  Graphical development environment for Arduino Automatically […]

Read More

Google Places and Polyline Symbols in TMS FNC Maps

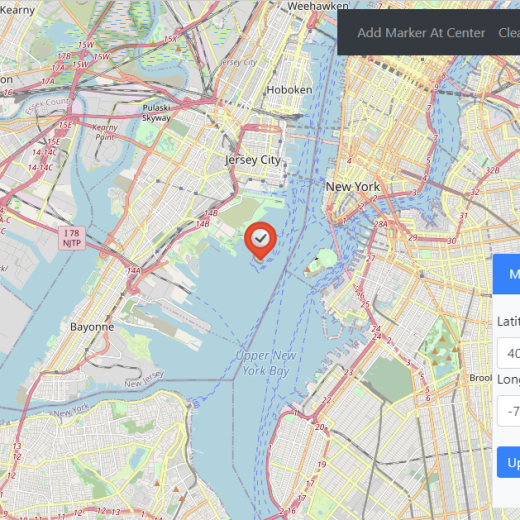
Introducing Google Places and polyline symbols support in TMS FNC Maps v2.4. Google Places AutoComplete The AutoComplete function provides suggestions based on a partial keyword search, usually provided by the end user. The results can be updated and displayed on the fly while the user is typing.The following example uses the TTMSFNCEdit component, available separately in TMS FNC UI Pack, to display the AutoComplete results in a dropdown panel. Thanks to the powerful combination of the TTMSFNCEdit and the synchronous GetAutoCompletSync call from TTMSFNCPlaces this can be achieved with a single line of code: procedure TForm1.TMSFNCEdit1LookupNeedData(Sender: TObject; Value: string; List: TStrings; var ItemIndex: Integer); begin List.Assign(TMSFNCPlaces1.GetAutoCompleteSync(Value)); end; Note: The AutoComplete functionality from Azure, Bing, Here and GeoApify is supported as well. Places Search The TTMSFNCGooglePlaces nearby search allows to search for specific places near a given location.This example displays a subset of the pharmacies found in the center of New York city. This is how the code looks: procedure TForm1.Button1Click(Sender: TObject); var c: TTMSFNCMapsCoordinateRec; begin c.Latitude := 40.7127753; c.Longitude := -74.0059728; TMSFNCGooglePlaces1.SearchNearby(c, ‘pharmacy’); end; procedure TForm1.TMSFNCGooglePlaces1SearchNearby(Sender: TObject; const ARequest: TTMSFNCPlacesRequest; const ARequestResult: TTMSFNCCloudBaseRequestResult); var I: Integer; begin for I := 0 to ARequest.Items.Count – 1 do begin m := TMSFNCGoogleMaps1.AddMarker(ARequest.Items[I].Coordinate.ToRec); m.AddOverlayView(ARequest.Items[I].Description); m.IconURL := ARequest.Items[I].Icon; m.DefaultIconSize := False; m.IconWidth := 32; m.IconHeight := 32; end; end; Polyline Symbols Another often requested feature was to have an option to add a direction indicator to a polyline. Polyline symbols provide a fully customizable way to achieve this. Here are a few examples that demonstrate how polyline symbols can be used in combination with Google Maps. This example shows a red closed arrow repeated every 50 pixels on a blue polyline. var ar: TTMSFNCMapsCoordinateRecArray; p: TTMSFNCGoogleMapsPolyline; ps: TTMSFNCGoogleMapsPolylineSymbol; begin TMSFNCGoogleMaps1.BeginUpdate; SetLength(ar, 3); ar[0].Latitude := TMSFNCGoogleMaps1.Options.DefaultLatitude – 0.1; ar[0].Longitude := TMSFNCGoogleMaps1.Options.DefaultLongitude – 0.1; ar[1].Latitude := TMSFNCGoogleMaps1.Options.DefaultLatitude + 0.1; ar[1].Longitude := TMSFNCGoogleMaps1.Options.DefaultLongitude + 0.1; ar[2].Latitude := TMSFNCGoogleMaps1.Options.DefaultLatitude – 0.1; ar[2].Longitude := TMSFNCGoogleMaps1.Options.DefaultLongitude + 0.1; p := TMSFNCGoogleMaps1.AddPolyline(ar); p.StrokeColor := gcBlue; ps := p.Symbols.Add; ps.Path := spForwardClosedArrow; ps.StrokeColor := gcRed; ps.RepeatSymbol := 50; TMSFNCGoogleMaps1.EndUpdate; end; This example shows how to use multiple symbols simultaneously including a symbol defined with a custom SVG path. var ar: TTMSFNCMapsCoordinateRecArray; p: TTMSFNCGoogleMapsPolyline; ps: TTMSFNCGoogleMapsPolylineSymbol; begin TMSFNCGoogleMaps1.BeginUpdate; SetLength(ar, 3); ar[0].Latitude := TMSFNCGoogleMaps1.Options.DefaultLatitude – 0.1; ar[0].Longitude := TMSFNCGoogleMaps1.Options.DefaultLongitude – 0.1; ar[1].Latitude := TMSFNCGoogleMaps1.Options.DefaultLatitude + 0.1; ar[1].Longitude := TMSFNCGoogleMaps1.Options.DefaultLongitude + 0.1; ar[2].Latitude := TMSFNCGoogleMaps1.Options.DefaultLatitude – 0.1; ar[2].Longitude := TMSFNCGoogleMaps1.Options.DefaultLongitude + 0.1; p := TMSFNCGoogleMaps1.AddPolyline(ar); p.StrokeColor := gcBlue; ps := p.Symbols.Add; ps.Path := spCustom; ps.CustomPath := ‘M -2,-2 2,2 M 2,-2 -2,2’; ps.Scale := 3; ps.Offset := 50; ps.RepeatSymbol := 50; ps.StrokeOpacity := 0.5; ps := p.Symbols.Add; ps.Path := spCircle; ps.Offset := 0; ps.RepeatSymbol := 100; ps.RepeatSymbolUnits := unPercentage; ps.Scale := 10; ps.StrokeWidth := 2; ps.StrokeColor := gcRed; ps.FillColor := gcRed; ps.FillOpacity := 1; TMSFNCGoogleMaps1.EndUpdate; end; Note: Polyline symbols are currently only available for the Google Maps mapping service. Available Now The TMS FNC Maps v2.4 update is available now for Delphi & Visual Studio Code (with TMS WEB Core). You can download the latest version and start using the new features right away!

Read More

Why We Love UI Components (And You Should, Too!)

As the web gets more technologically advanced, websites and applications have gotten more robust too. Modern-day web applications are powerful in their processing capabilities and don’t even require blazing fast internet speeds. However, there are many instances of a web product failing to achieve its deserved audience. An overwhelming number of these instances owe their failure to a poor interface. Users no longer experience the web just on their laptops or desktops. Nowadays, internet surfing has become more common on handheld devices like tablets and smartphones. Therefore, websites need to deliver a satisfactory user experience on all different kinds of devices. To achieve this, their UI needs to have a user-centric design approach. UI and UX aspects of applications have gained focus in recent times. Enterprises have begun investing in dedicated positions to build a good UI. However, tools like Sencha ExtAngular give you a library of pre-implemented UI components that you can easily integrate into your front-end. Such tools save vast amounts of time and effort while making a clean and efficient UI possible. This article explains how UI components work and why their inclusion can give your website the needed visual flair to attract a broader user base. Why Should You Take A Component-based Approach To Building Your UI? In today’s times, applications are no longer a monolithic piece of technology. Several pieces are working under the hood and handling their specific responsibilities to deliver a seamless experience. Modularity has become a rising requirement from developers and has led to the advent of technologies like microservices. With a modular approach, each component can be developed, maintained, and upgraded individually. By including UI components into your front-end, you get to enjoy a modular visual layout. Pieces can be exchanged with more robust replacements without hurting the whole arrangement. What Benefits Come With Including UI Components Into Your Website? While it may seem like a straightforward task, creating a satisfying UI can involve some of the most crucial decision-making related to the whole product. The UI and UX are often deciding factors of the product’s success, and its design carries the weight of this responsibility. Therefore, the creators of the UI are doing an essential task and need to use the best resources. You can cut much of the hassle and directly implement visually appealing features by opting for quality pre-developed UI components. Many UI components offer you the facility of customizing their color themes and textures, so you have complete control over the result. Involving the right UI components can be just the choice that takes your application’s visuals to a new level. What Should You Look For When Choosing UI Components? Pre-developed UI components are hardly a new concept. A wide range of options is available for almost all popular front-end technologies. However, you cannot just select any random UI component to go on your website if you decide to use them. You will need to ensure certain aspects to confidently involve them in your front-end and achieve your desired goals. Some of the most crucial characteristics that you should look out for when selecting your UI components are given below: Seamless Integration With Front-End While many websites may have a similar visual look, almost all aim to implement a unique front-end to stand out and have their […]

Read More

How To Make Faster And More Glamorous Modern Apps With C++

Hello C++ Developers, LearnCPlusPlus.org is packed full of great articles for professionals and beginners on new modern C++ topics to speed up your applications and to make them look visually stunning with an updated, modern look in a few simple steps. In these articles, we explain how you can simply use all cores of your CPU by using Parallel Programming Library in C++ Builder. We explain the dark and light sides of the Brute Force Method. We teach how you can use the sscanf function in C and C++. How you can apply Glow Effects and Shadow Effects to have a gorgeous modern application with UI visuals which really add a touch of glamour so they don’t just work better they look better too. Examples and some tips in the posts may help Delphi developers too. If you are new to RAD Studio, we think these posts may help you as much as a rapid introduction to programming in C++, all the way to the most robust, modern, and latest techniques for those more experienced with the language. For those who are perhaps wanting to expand their knowledge with the most up-to-date features, routines, and methodologies this is a great little boost (pun intended) to your C++ knowledge. The new RAD Studio 11, C++ Builder 11, Delphi 11 are released with great new features and we are developing and testing new examples for you with the latest RADS 11 that means.LearnCPlusPlus.org examples are working well with the latest C++ Builder. You can see more of our C++ posts on this blog by clicking the following dynamic search link: https://blogs.embarcadero.com/?s=C%2B%2B Here are our selections, How can we use C++ Builder in the most modern and efficient ways? These posts are designed to be easy to understand the modern and professional ways that we use in C++. Here are the topics, This Is How To Use Parallel Programming in C++ Builder? Why You Should Know About Brute Force Methods in C++? What Is The sscanf Function In C++ And How Can I Use It? How To Make Controls Have A Glow Effect In C++? How To Add Shadow Effects To Your C++ Apps? What kind of C++ questions are we answering? These are the questions that we answer in this collection: How can I use all cores and threads of my CPU? What is Parallel Programming? How can I speed up my applications? Is there an example of using TParallel in C++ Builder? How does C++ Builder help with parallel programming in C++? What is Brute Force Method? How we can use the Proof By Exhaustion Method? What are Proof by Case and Proof by Analysis? How we can code Brute Force Method in C++? How we can prevent our servers from Brute Force Attacks? What is the sscanf function? How can I use sscanf in C++? Where can I find format specifiers for the sccanf function? What is the syntax of sscanf? What is a simple example of the sscanf function in C++? Is there a full example of sscanf function in C++?  Is there an easy way to add glow effects to components? How can I add glow to alpha images on my applications? What is a Glow Effect in C++? How can I use TGlowEffect in C++ Builder? What are the visual tips to add glows in the development of C++ applications? Is there an easy way to add custom shadows to components? How can I add shadow to alpha images on my applications? What is the Shadow Effect in C++? How can I […]

Read More

New Platform Identifiers in RAD Studio, Delphi and C++Builder 11 Alexandria

System.Classes.pas     { Platform identifiers }   pidWin32          = $00000001;   pidWin64          = $00000002;   pidOSX32          = $00000004;   pidiOSSimulator32 = $00000008;   pidiOSSimulator   = pidiOSSimulator32 deprecated ‘Use pidiOSSimulator32’;   pidAndroidArm32   = $00000010;   pidAndroid32Arm   = pidAndroidArm32 deprecated ‘Use pidAndroidArm32’;   pidAndroid        = pidAndroidArm32 deprecated ‘Use pidAndroidArm32’;   pidLinux32        = $00000020;   pidiOSDevice32    = $00000040;   pidiOSDevice      = pidiOSDevice32 deprecated ‘Use pidiOSDevice32’;   pidLinux64        = $00000080;     pidWinNX32        = $00000100;   pidWinIoT32       = $00000200; // Embedded IoT (Internet of Things) Windows w/ Intel Galileo   pidiOSDevice64    = $00000400;   pidWinARM32       = $00000800;   pidWin32ARM       = pidWinARM32 deprecated ‘Use pidWinARM32’;   pidOSX64          = $00001000;   pidLinuxArm32     = $00002000;   pidLinuxArm64     = $00004000;   pidAndroidArm64   = $00008000;   pidAndroid64Arm   = pidAndroidArm64 deprecated ‘Use pidAndroidArm64’;     pidiOSSimulator64 = $00010000;     pidOSXArm64       = $00020000;   pidWinArm64       = $00040000;   pidiOSSimulatorArm64 = $00080000;     pidAllPlatforms = pidWin32 or pidWin64 or                     pidOSX32 or pidOSX64 or pidOSXArm64 or                     pidiOSDevice32 or pidiOSDevice64 or                     pidiOSSimulator32 or pidiOSSimulator64 or                     pidAndroidArm32 or pidAndroidArm64 or                     pidLinux64;     { Platform family identifiers }   pfidWindows     = pidWin32 or pidWin64;   pfidOSX         = pidOSX32 or pidOSX64 or pidOSXArm64;   pfidiOS         = pidiOSDevice32 or pidiOSDevice64 or                     pidiOSSimulator32 or pidiOSSimulator64;   pfidAndroid     = pidAndroidArm32 or pidAndroidArm64;   pfidLinux       = pidLinux64;

Read More

A Delphi Miletus app on a sub 15€ Raspberry Pi Zero 2

Delphi IDE  Compile  XCOPY  Run on 15€ SBC Yes, that is exactly what we can do with Miletus technology in TMS WEB Core!  Create a new Miletus application from the Delphi IDE, Use a RAD component based approach with Object Pascal code to develop an app Compile for the Raspberry Pi build configuration XCOPY the single executable generated to the Raspberry Pi  Run the executable on the Raspberry Pi While we did all initial developments of Miletus on a +/- 35€ Raspberry Pi 4, we finally could put our hands on the brand new sub 15€ and much smaller Raspberry Pi Zero 2 and validate that the Miletus apps were still running on it. The good news is that it does! See in this video how we run the app with FNC gauge & chart controls and interfacing to a Bosch sensor (BME280) for air pressure, temperature and humidity: You can download the full source code of this Miletus app here. Want to learn more? Check out this blog with a video that shows step by step how you create the Miletus app for Raspberry Pi from the Delphi IDE. Get started! Miletus technology is part of TMS WEB Core and is included. Download the fully functional trial version of TMS WEB Core for Delphi or TMS WEB Core for Visual Studio Code and get started. And yes, you read that well, you can also use the free Visual Studio Code IDE used by millions with TMS WEB Core to create not only web apps but also cross platform Miletus apps.

Read More

TMS WEB Core : a reader’s digest blog post

It’s well over 2 years ago that we took the wraps of TMS WEB Core and meanwhile a lot has been written and said about TMS WEB Core. We had numerous blog posts, webinars and of course the book written by our colleague Holger Flick. So much content is spread in several places and users keep asking questions that were covered somewhere but aren’t easy to find. That is what inspired us to bring a reader’s digest blog post of worthwhile information for developers wanting to get started with TMS WEB Core. And for sure, with the upcoming XMas holiday season, it is an excellent time to sit down and explore the wonderful world of TMS WEB Core. What server do I need for TMS WEB Core web applications? A TMS WEB Core web application consists of JavaScript code that was transpiled from Object Pascal and HTML, CSS, image resources and maybe some other JavaScript libraries. As such, any web server that can server HTML pages will do. Evidently, this is IIS, Apache, embed in WordPress… we even have customers who deployed a TMS WEB Core web client application on an Arduino web server hat. TMS WEB Core comes with a debug web server, that is a small HTTP server that will immediately show your application running in the browser after compiling. This small web server (built using our own TMS Sparkle product) is just intended for debugging purposes and is in no way meant to use to deploy a TMS WEB Core app.  Can I compile any Delphi code with TMS WEB Core? No! While TMS WEB Core offers via the pas2js transpiler and its RTL a wide coverage of the Delphi language as well as the RTL, it is not 100% at the same level for various reasons. For example, pointers cannot be used. In a browser, the concept pointer doesn’t exist, hence, it is impossible to work with pointers in TMS WEB Core code. Another example that isn’t supported yet, is inline variables. This is a newer Delphi language feature not yet widely used nor requested. But be assured that most is supported, including generics, anonymous methods, RTTI, … How do I access databases? Typically, you will want to have a central hosted database where the data used by the users of your web application will be managed. A mechanism is needed to ensure your database is not wide open to just anyone with a browser. The common pattern to handle this, is by creating a REST API server that offers access to your database. There are many ways to create such REST API server. The good news is that TMS WEB Core is open to use any such REST API server. For somewhat more out of the box convenience, we have TMS XData that includes not only the REST API server part but also web client helper classes.  Can I access device hardware in the web application? It is amazing how the browser technology has evolved and offers access to a myriad of hardware on your machine or devices. This includes the camera, microphone, GPS, USB port, motion sensor, compass, Bluetooth connectivity, audio output … And yes, TMS WEB Core includes components for easy access to these devices. Can I use existing JavaScript libraries? Given the wealth […]

Read More